The Installer Utility for Message Server 3.x is backward compatible with older versions of Sniffer and can upgrade those systems quickly and easily.
This page will detail the steps to using all the features the V3.x SNF_CS_Installer.exe. (Download the Installer from the Downloads page.
General Objectives
The general objective of this document is to provide a demo of installing Message Sniffer Server as a service for multiple Windows mail servers. This installation is simple and can be handled by first time users and experienced administrators alike.
Architectural Overview
The V3.x SNF_CS_Installer.exe file should not be discarded. Keep it in your Downloads folder. It is the interface to the full utility and the mechanisms for managing a reinstall to a different mail platform or an uninstall. Though not necessary, we recommend that you let this file exist in your general filter application folder. For example, in the appropriate Declude folder for either a Smartermail or Imail installation; somewhere where you will look for it when you need it.
Currently Supported Install Bases Include:
- Alligate
- IceWarp
- Imail + Declude
- Imail + MXGuard
- Imail stand alone (using MINIMI)
- MDaemon (as a plugin)
- SmarterMail + Declude
- SmarterMail + MXGuard
- SNFClient + SNFServer Custom
Current Dependencies:
The current V3.x MessageSniffer Client/Server version requires that the Message Sniffer server operate as a service. In order for Message Sniffer to be enabled in a convienent installer, we have included (with implied permission and all open license files included) the XYNTService application as referenced by codeproject and elsewhere.
XYNTService is namespace safe and will not interfere with other services being wrapped by XYNTService. Many thanks to Xiangyang Liu for providing such a superb tool for the development community.
If for some reason you need to NOT USE XYNTService, then you need to manually install and configure MessageSniffer, as ALL VERSIONS OF THE INSTALL UTILITY currently utilize XYNTService.
We will be releasing a true Windows service version shortly for beta testing. Please email support@armresearch.com if you would like to be on the beta test release.
Installer Overview
Step 1: Platform Selection
After the splash screen, the installer will ask you to select the platform that you will be using with Message Sniffer (Figure 1).
Figure 1
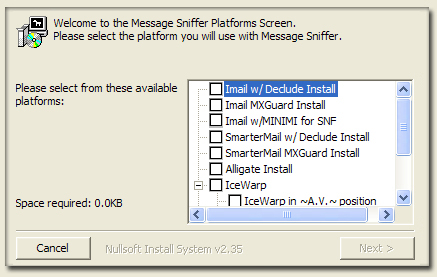
This installer version supports several specific mail platforms. Each platform possesses different means of tieing in the Message Sniffer filtering engine into your mail pipeline. We also leave it open for a "plain-jane" to help you perform an install for any mail system that you would like, though the installer will naturally only help you place and configure files that it recognizes or owns implicitly.
In the following example (Figure 2), a user selects the Message Sniffer install with the MINIMI mail shim for Imail.
Note: This installer comes complete with the most recent MINIMI executable as a fully included install option. You do NOT need to download MINIMI seperately (available in the tools section, for manual installation of Sniffer).
Figure 2

After you select the platform of your choice the 'NEXT' button will be enabled.
Note: The only difference with your experience selecting any of the differing mail platform choice presented in Figure 2, might be the following popup (Figure 3) when selecting MINIMI, the mail shim for directly attaching Message Sniffer into Imail's SEND chain.
Figure 3
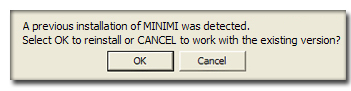
Generally, unless you really want to use your current version of MINIMI (if you installed one previously), clicking OK will cause the installer to put the most recent version of the MINIMI executable into the appropriate location.
Step 2: Folder Setup
The file location screen (Figure 4, showing someone installing with Imail w/ MINIMI) assists you by ensuring that the platform you have selected exists and its supporting files can be found.
The installer will not let you beyond Figure 4 if it cannot find the necessary files for that program. i.e. The global.cfg file (for DECLUDE) or the mxguard.ini file (for MXGuard) or the SMTP32.exe file for MINIMI's install with IMail. These files are typically located in the folders of their respective platforms. The system datamines the registry if it can find the application you selected, but if you have installed the program on a non-standard drive and it has no discernable install pattern, (MXGuard for Smartermail, for example) then you will have to manually locate the folder before proceeding.
Figure 4
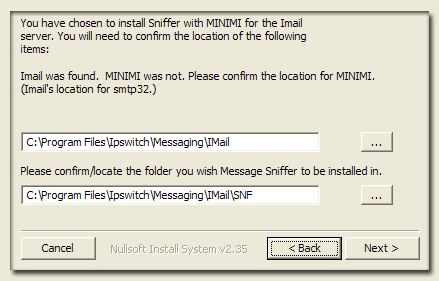
The second directory box is for selecting where you would like to locate Message Sniffer. The Installer suggests a typical location (for ease in troubleshooting and tech support).
The NEXT button will be enabled if it locates the dependent files, and greyed in the event that it made the best guess, but couldn't find it. The buttons to the right of the folders allow you to select the appropriate locations for your install.
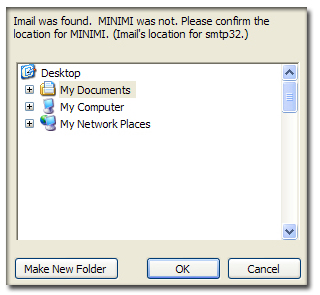
If you select the button to the right you will be given a popup to browse for locations (Figure 5).
Figure 5
Note: The following popup (Figure 6) is specific to the MINIMI install track and notifies you of the order that Message Sniffer is going to be inserted into the mail pipeline. It informs you of Imail's current target and shows you where Message Sniffer will hand the messages that it flags for delivery.
Figure 6

Step 3: Activity Selection
This page (Figure 7) requests you to select your installer activity.
Under normal circumstances this will only offer the NEW INSTALL option. However, if the system detects that you had a previous install, it will allow you to reinstall, remove the install, or check the status of the system.
Figure 7
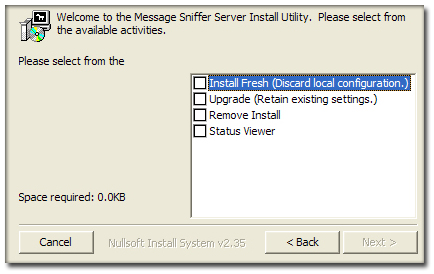
Note About Upgrading and Removal: If you are a current Sniffer customer and are upgrading, it will slightly change your options here. You may not see the option to remove. If you have a pre-existing manually installed system in the folder that you selected as Sniffer's home in Figure 4, REMOVE INSTALL will not be an option. The Uninstall sequence intentionally only uninstalls a system that it installed. It will upgrade an older system. This is part of our "Do No Harm" policy. The installer is equipped with a single rollback feature. If you were working with a functional, older install, and you attempted an upgrade, it will keep copies of the older system for replacement if you choose to uninstall the upgrade. Upon uninstall it should leave you with the previous state it detected. The only way to uninstall a manually installed version is to manually delete it.
Note for existing users: Currently, the only difference between the Fresh Install and the Upgrade (Retain Settings) is in the way the installer handles the default ON-OFF setting of the automatic rulebase download feature. If you had a working manual install, and you WANT to continue to use your own download paradigm, then choose Upgrade (Retain Settings). This will default the auto-download to OFF. A Fresh Install will leave the auto-rulebase-download feature set to ON (if you had some other download paradigm in place, you should turn that off.) In the future, the scope of these settings may expand, but it will always imply "using the default settings for the new features" -vs- "keeping a backward compatible set of settings".
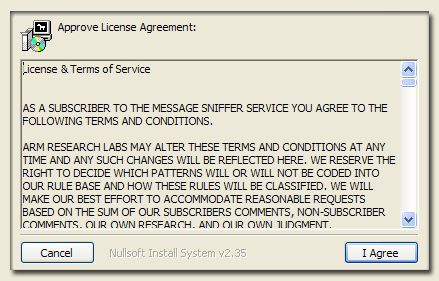
Step 4: Agreements
At this point the installer opens a new window and requests that you read our software policy (Figure 8).
Figure 8
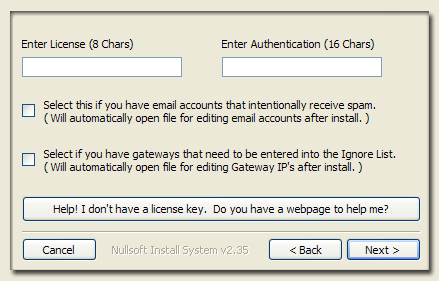
Step 5: Authentication Settings
If you are re-installing, or upgrading over top of a manual install, then this screen (Figure 9) may come pre-populated with license and authentication values. If it does not, then you need to carefully enter your license id and the authentication string you received when you signed up for the free 30 day trial.
Careful Step: Both the license and authentication have length validation in case you miss a letter, but if you progress through obtaining a rulebase and the rulebase fails the SNF2Check.exe's authentication test, then you need to come back to this screen and confirm you typed in your authentication correctly. Also you may mark the check boxes if you want the installer to automatically open these options for you to edit.
If you just downloaded the installer and didn't sign up for a 30 day trial and receive your license id and authentication, you may sign up for the trial by selecting the help button.
Figure 9
Step 6: Downloading a Rulebase
You need a rulebase to continue. If you were installing for the first time, the option to skip downloading (Figure 10) would be hidden.
NOTE: THIS CAN SOMETIMES TAKE A LONG TIME. But if you already have a valid rulebase, then you can let the update process handle it at a later time.
Figure 10

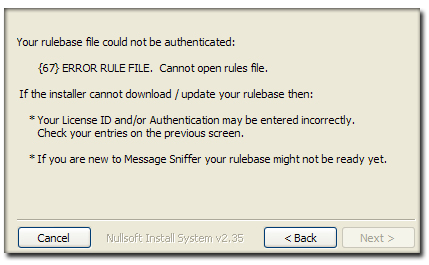
Step 7: Confirming a Valid Rulebase
If you see the validation screen, then the rulebase either did not authenticate or was corrupted during download. (Figure 11). Did you mis-type your Authentication string? The installer double checks and doesn't let you buy until you've got this all taken care of. MOST of our issues with install involve a mis-typed authentication string.
Figure 11
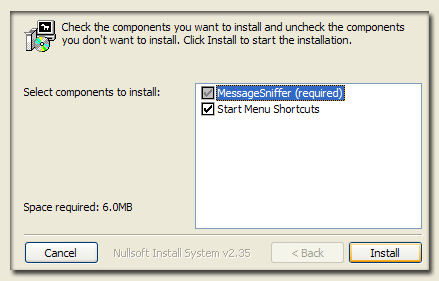
Step 8: Component Selection
The last option is for a Shortcuts button to be added to your PROGRAMS menu (Figure 12). Clicking "install" completes the process and you will be rewarded with a splash screen telling you that you have succeeded.
Figure 12
Uninstalling
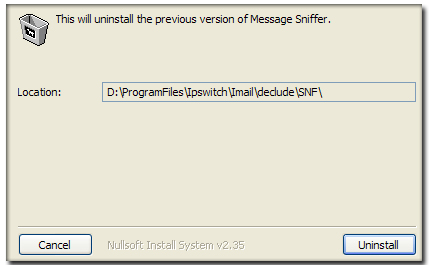
If you eventually desire to uninstall Message Sniffer,the Activities screen will offer you the choice to uninstall (Figure 13). The process starts with selecting the platform and location of your current install (Figure 14).
Figure 13
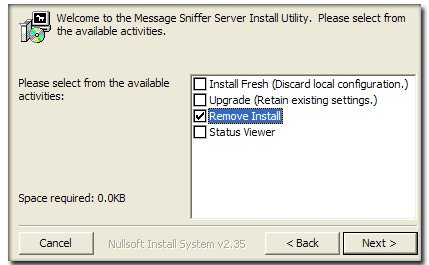
Figure 14
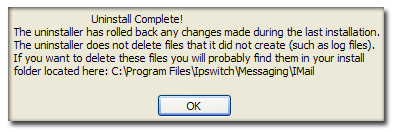
If you successfully uninstall you will see the following screen (Figure 15). It reminds you that the uninstaller will only remove files that IT created or took over. It will not delete an installation that you manually installed. If you remove an install that was put on top of a manual install, you will be left with the manual install and its settings intact.
Figure 15
Technical Summary
Basic Sniffer Install:
|
Please email support@armresearch.com with any questions.